A failed tape seal is one of the cheapest problems to cause and one of the most expensive to clean up. A carton that pops open in transit means a damaged product, a refund, and a customer who now associates your brand with a box that arrived taped shut with someone else’s tape. Most of these failures do not come from bad tape. They come from the wrong tape used the wrong way: a thickness that does not match the load, an adhesive that quits in the cold, a seam that was never reinforced, or a bond that never fully formed. Here are the five mistakes that cause branded packing tape to let go, and how to specify around each one so the tape holds and your logo stays on the box.
Mistake 1: Choosing thickness by feel instead of by box weight
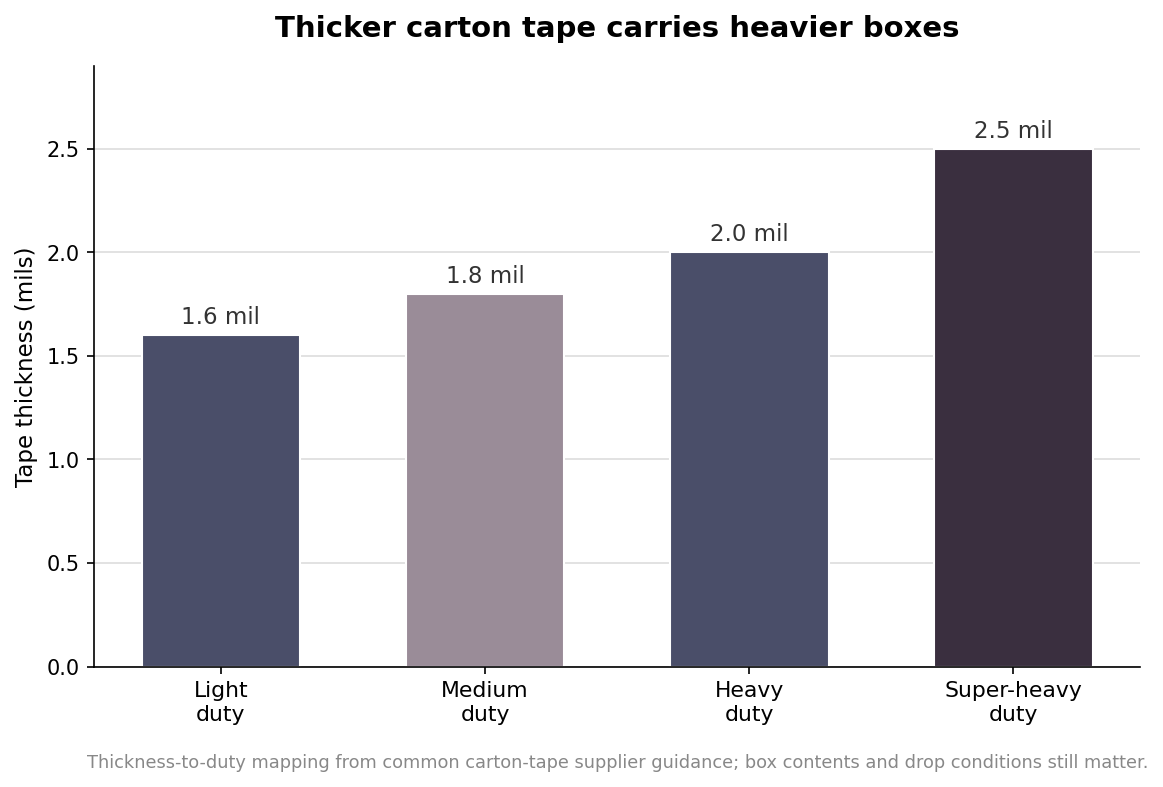
Carton sealing tape is graded by thickness in mils, where one mil is a thousandth of an inch measured with a micrometer. The number is a decent proxy for how much adhesive and backing you are getting. As a rough industry mapping, 1.6 mil is a light-duty tape for small parcels and low-weight boxes, 1.8 mil handles medium-duty everyday cartons, 2.0 mil is heavy-duty, and anything above that is super-heavy-duty for dense or oversized loads. Some suppliers now offer half-step options like 1.7 and 2.1 mil for buyers who want to fine-tune cost against holding power. Because thicker tape carries more adhesive, it generally holds better, but paying for 2.5 mil to seal a two-pound apparel mailer is money spent on nothing. The mistake runs both ways: under-spec and boxes burst, over-spec and your cost per carton creeps up across thousands of shipments. Match the mil to the heaviest box the roll will actually seal, not the lightest, and remember that a box packed to the brim behaves like a heavier box than its empty weight suggests.
Mistake 2: Running hot melt tape into the cold
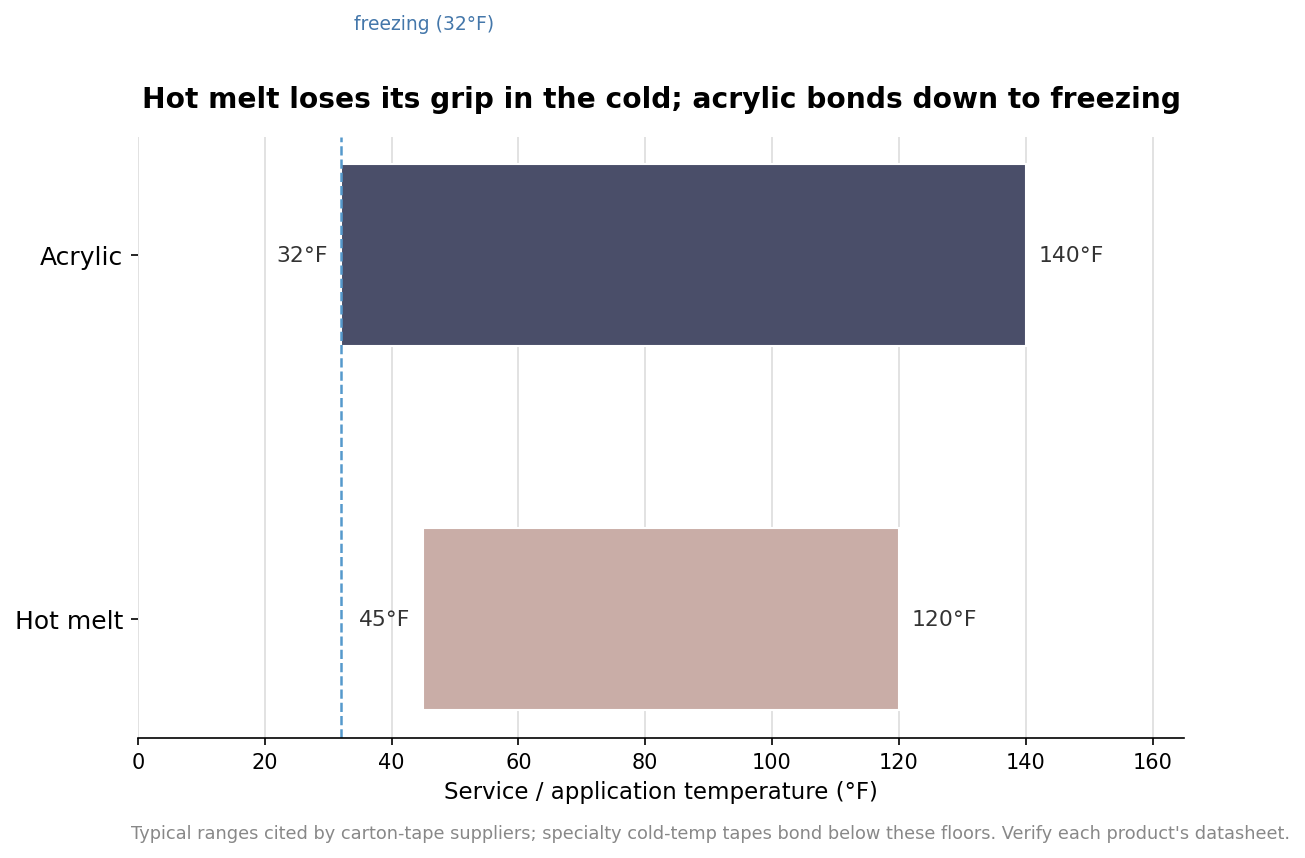
Adhesive chemistry is temperature-sensitive, and this is where a lot of winter and cold-storage failures start. Hot melt adhesive gives an aggressive, fast grab at room temperature, but its bond weakens as the thermometer drops and it struggles below roughly 45°F. Acrylic adhesive bonds across a wider band, typically from around freezing at 32°F up to about 140°F, which is why it is the safer default for tape that will be applied on a cold dock or ride through an unheated trailer. If your cartons are sealed or stored below freezing, neither general-purpose option is enough; purpose-built cold-temperature tapes are formulated to bond at sub-freezing surfaces. The failure mode is sneaky because the tape looks stuck when it leaves the warm packing station and only peels once the box has spent hours in the cold, which means you rarely see the failure happen and only hear about it from the customer.
Mistake 3: Under-taping the seam on heavy cartons
A single center strip is fine for a light box, but heavier cartons need more than one line of defense. The standard fix is the H-tape method: one strip down the center seam plus a strip across each end flap, so the finished tape pattern looks like an H when you view the box from the side. For wide or heavy cartons, a common recommendation is to move from 2-inch tape to 3-inch tape once the box exceeds about 16 inches wide, and to use one continuous strip rather than two narrow parallel strips, since a single wide seal spreads stress better and uses less labor. Skimping here is a false economy, because the reinforcement costs a few extra inches of tape and prevents the seam from being the weak point. The heavier the contents and the longer the transit, the more the H-pattern earns back its small extra cost in avoided damage claims.
Mistake 4: Ignoring surface, pressure, and dwell time
Pressure-sensitive tape bonds through three things working together: a clean surface, firm application pressure, and a little time to build adhesion. Recycled kraft cartons are dusty and porous, and dust is the enemy of a good bond, so tape laid lightly onto a dusty flap will look sealed and peel later. The remedy is mechanical, not chemical: run a tape gun or wipe-down applicator that presses the tape firmly onto the box, and give the adhesive a moment to key into the fibers before the carton is stacked. Humidity and moisture on the flap surface work against the bond in the same way dust does, so cartons pulled from a damp storage area deserve extra attention. This matters even more for the thinner, lower-cost tapes, which have less adhesive to compensate for a rushed application.
Mistake 5: Buying on price per roll instead of price per yard
The last mistake is an ordering one. Hand rolls commonly come in 55-yard and 110-yard lengths, while machine rolls run 1,000 to 2,000 yards, and a cheap-looking short roll can cost more per yard than a longer one. Two rolls that print the same at a glance can differ in length, backing thickness, and core size, so the only fair comparison is cost per usable yard for the thickness you actually need. When you are ordering custom printed tape, lock the specification before the price conversation: width, mil, adhesive type, roll length, and core size to fit your dispensers. Get those five numbers right and the branded tape does its real job, which is holding the box shut all the way to the doorstep while carrying your logo the whole way.
Leave a Reply